“(RB-13K111)6自由度机械臂(Arduino版本)”的版本间的差异
(→例子程序) |
(→例子程序) |
||
| 第38行: | 第38行: | ||
[[文件:13K11104.png|600px|有框|居中|安装后整体效果图]] | [[文件:13K11104.png|600px|有框|居中|安装后整体效果图]] | ||
==例子程序== | ==例子程序== | ||
| − | 程序编译上传前,需要下载程序使用的库文件[ | + | 程序编译上传前,需要下载程序使用的库文件[http://pan.baidu.com/s/1dDz4kCh Arduino版机械臂库文件下载地址]<br/> |
<pre style="color:blue"> | <pre style="color:blue"> | ||
#include <Servo.h> //调用一些库文件 | #include <Servo.h> //调用一些库文件 | ||
2015年10月16日 (五) 13:38的最后版本
目录 |
产品概述
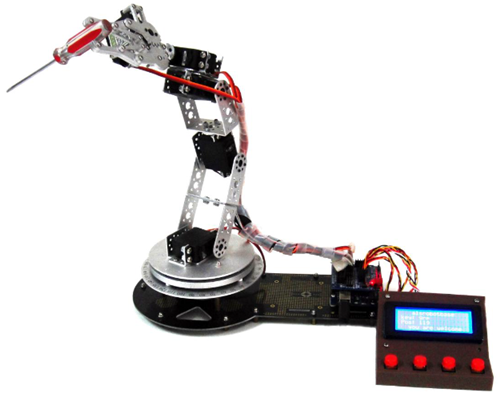
机械手臂目前在机械人技术领域中得到广泛的应用,在工业制造、医学治疗、娱乐服务、教学应用、军事以及太空探索等领域都能见到它的身影。虽然大家经常在电影或者电视中见过,似曾想过拥有一台属于自己的机械臂,因其功能针对性强和高额的售价,使我们望而却步。现在你不必担心这个问题了,AS-6D0F铝合金机械臂套件,可以实现你的机器人梦想。此版说明书主要介绍如何利用4个大按钮模块与Arduino Uno控制器之间的通讯直接控制六自由度机械臂并且在LCD2004液晶屏上实时显示监控到的信息,此说明书还介绍Arduino Uno控制器与LCD2004液晶屏及大按键之间的接线和调试过程,按照此说明书的步骤一步一步的组装完成后,给其上电,通过4个大按钮模块就可以轻松实现对六自由度机械臂的控制。
主控器技术参数
- 主控器:Carduino UNO R3
- 微处理器:ATmega328
- Flash 内存:32 KB (ATmega328 其中0.5 KB 用于引导程序)
- 工作电压:5V
- 输入电压:接上USB 时无须外部供电或外部7V~12V DC 输入
- 输出电压:5V DC 输出和3.3V DC 输出和外部电源输入
- 时钟频率:16 MHz
- 输入电压:7-12V(推荐)
- 输入电压:6-20V(限制)
- 支持USB 接口协议及供电(不需外接电源)
- 支持ISP 下载功能
- 数字I/O 端口:14(6 个PWM 输出口)
- 模拟输入端口:6
- 直流电流:40mA(I/O 端口)
- 直流电流:50mA(3.3V 端口)
- EEPROM:1 KB (ATmega328)
- SRAM:2 KB (ATmega328)
- 尺寸:75x55x15mm
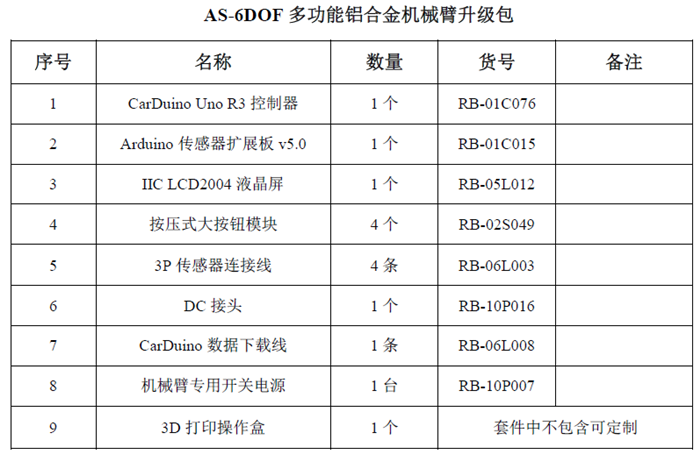
零件列表
安装连线
步骤1:CarDuino Uno控制器与传感器扩展版安装并给Carduino UNO下载例程
步骤2:按压式大按钮模块与传感器连接
将4个大按钮模块分别接到传感器扩展板v5.0的4个模拟口A0.A1.A2.A3,作为机械臂的控制按键(A0被按下时舵机号从上至下1,A1被按下时舵机号从下至上1,A2被按下时舵机顺时针转,A3被按下时舵机逆时针转)。
步骤3:RB-150MG与传感器扩展板连接
将底盘到夹持器的舵机顺次连接到传感器扩展板的6个数字口D4(底盘舵机)D5.D6.D7.D8.D9(夹持器舵机)。
步骤4 IIC LCD2004液晶显示屏与传感器扩展板连接
将IIC LCD2004液晶显示屏接到传感器扩展板v5.0的IIC 接口
步骤5 Arduino传感器扩展板v5.0外部供电
使用开关电源(5V给传感器扩展板v5.0供电,12V给CarDuino Uno控制器供电),红色接VCC,黑色接GND,(注意区分正负极),取下传感器扩展板v5.0的跳线帽,选择数字口外部供电,其他扩展口依然是板内取电。
步骤6给CarDuino Uno供电
给CarDuino Uno上电(程序之前已经下载好了),图11,按下传感器扩展板v5.0的复位键,重启CarDuino Uno控制器,此时IIC LCD2004液晶屏会显示预设的文字信息。
例子程序
程序编译上传前,需要下载程序使用的库文件Arduino版机械臂库文件下载地址
#include <Servo.h>      //调用一些库文件
#include <TimedAction.h>
#include <SimpleTimer.h>
#include <Wire.h>
#include <LiquidCrystal_I2C.h>
                                //定义舵机位置名称,并编号。
const int base =      0;
const int shoulder =   1;
const int elbow =     2;
const int wristflex =   3;
const int wristrot =    4;
const int gripper =    5;

const int stdDelay =   20;         //舵机运动延时(单位ms)
const int maxServos =  6;         //舵机的数量
const int centerPos =  90;        //舵机中位位置

unsigned long key_millis = 0;
unsigned long button_millis = 0;
int keyDelay = 100;              //定义延时时间
int buttonDelay = 50;           //定义按键延时
int thisServo = base;           //定义起始电机

typedef struct{              //数组框架结构
  byte neutral;             //中位角度
  byte minPos;             //最小角度
  byte maxPos;            //最大角度
  byte delaySpeed;         //延时时间
  byte curPos;            //舵机当前角度
} ServoPos;              //结构体名称

ServoPos servosPos[] = {    //对舵机限位
  { 90, 180, 10, stdDelay, 0 }, //中位90,最小角度180,最大角度10,范围0~180度。
  { 90, 180, 10, stdDelay, 0 },
  { 90, 180, 60, stdDelay, 0 },
  { 90, 170, 50, stdDelay, 0 },
  { 90, 180, 10, 10, 0 },
  { 90, 125, 55, 5, 0 }
};

byte serv = 90;
int counter = 0;
int curServo = 0;
int sMove[] = {0, 90, 0};
int sAttach[] = {0, 0};

LiquidCrystal_I2C lcd(0x27,20,4);     //0x27  D7~D0端口开关设置0x表示十六进制27转换成16进制数是00100111  1代表开,0代表关, 20列,4行,行号从零算起,第一行行号0,第二行行号1.
Servo servos[maxServos];
int destServoPos[maxServos];
int currentServoPos[maxServos];

TimedAction servoMove[maxServos] = TimedAction(100, doServoFunc);   // 延时,延时时间为声明时间。
SimpleTimer timer;            // For movement tests
TimedAction keys = TimedAction(10, keypadFunc);

void setup() {                            //设置
  delay(200);
  Wire.begin();
  lcd.init();                             //LCD初始化
  lcd.backlight();                 //LCD背光灯打开
  delay(500);
  lcd.on();                     // LCD开机
  setupDisplay();               //调用子程序,设置显示内容门,后面有定义。

  for(int i=0; i<maxServos; i++) {
    servos[i].write(servosPos[i].neutral);
    servosPos[i].curPos = servosPos[i].neutral;
    servos[i].attach(i+4);
    destServoPos[i] = centerPos;
    currentServoPos[i] = centerPos;
    servoMove[i].disable();
  }
  //timer.setInterval(5000, servoTestFunc);
}

void loop() {
  for(int x=0; x<maxServos; x++) {
    curServo = x;
    servoMove[x].check();
  }
  //timer.run();
  keys.check();
  navSwitchFunc();
}

void servoTestFunc() {
  if(counter % 2) {
    Move(thisServo, servosPos[thisServo].minPos, servosPos[thisServo].delaySpeed);
  }
  else
    Move(thisServo, servosPos[thisServo].maxPos, servosPos[thisServo].delaySpeed);
  counter++;
}

void writeServo() {
  int servoNum = sMove[0];
  if(servoNum >=0 && servoNum <= maxServos) {
    destServoPos[servoNum] = sMove[1];
    servoMove[servoNum].enable();
    servoMove[servoNum].setInterval(sMove[2]);
  }
}

void setServoAttach() {
  int servo = 1;    // sAttach[0]
  int mode = 2;     // sAttach[1]
  if(servo >= 0 && servo <= maxServos) {
    if (mode == 1)
      servos[servo].attach(servo+4);
    else
      servos[servo].detach();
  }
}

void doServoFunc() {
  int x = curServo;
  if(destServoPos[x] == currentServoPos[x])
    servoMove[x].disable();
  if(destServoPos[x] > currentServoPos[x])
    currentServoPos[x]++;
  else
    currentServoPos[x]--;

  servosPos[x].curPos = constrain(currentServoPos[x], servosPos[x].maxPos, servosPos[x].minPos);
  currentServoPos[x] = servosPos[x].curPos;
  servos[x].write(currentServoPos[x]);
  jointPos(x, currentServoPos[x]);
}

void Move(int servoNum, int servoPosition, int delayTime) {  //舵机驱动指令
  sMove[0] = servoNum;             //所驱动舵机号
  sMove[1] = servoPosition;          //舵机的目标位置
  sMove[2] = delayTime;            //每个舵机运动的延迟时长
  writeServo();
}

void Attach(int servoNum, int servoMode) {
  sAttach[0] = servoNum;
  sAttach[1] = servoMode;
}

void navSwitchFunc() {                //键盘检测子程序
    if (millis() > button_millis + buttonDelay) {
    button_millis = millis();
    if(digitalRead(A0) == LOW) {      // 当A0引脚低电平
      thisServo--;                   //电机号自加1
      thisServo = constrain(thisServo, 0, 5); //电机控制范围
      jointPos(thisServo, servosPos[thisServo].curPos);
      delay(200);                 //延时200毫秒
    }
    if(digitalRead(A1)== LOW) {      //当A1引脚低电平
      thisServo++;                 //电机号自加1
      thisServo = constrain(thisServo, 0, 5); //电机控制范围
      jointPos(thisServo, servosPos[thisServo].curPos);
      delay(200);                 //延时200毫秒
    }
    if(digitalRead(A2) == LOW) {      //当A2引脚低电平
      byte t = thisServo;
      servosPos[t].curPos--;       //电机角度自减1
      servosPos[t].curPos = constrain(servosPos[t].curPos, servosPos[t].maxPos, servosPos[t].minPos);
      jointPos(t, servosPos[t].curPos);
    }
    if(digitalRead(A3) == LOW) {     //当A3引脚低电平
      byte t = thisServo;
      servosPos[t].curPos++;         //电机角度自减1
      servosPos[t].curPos = constrain(servosPos[t].curPos, servosPos[t].maxPos, servosPos[t].minPos);
      jointPos(t, servosPos[t].curPos);
    }
  }
}

void keypadFunc() {
  byte keypad = lcd.keypad();
  lcd.command(0);
  if (keypad !=0) {
    if (millis() > key_millis + keyDelay) {
      keypress(keypad);
      key_millis = millis();
    }
  }
}

void keypress (byte keypad) {  //读取按键按下情况。
  byte t;
  lcd.setCursor(15, 1);
  switch(keypad) {
    case 1:
      lcd.print("1");
      t = base;
      servosPos[t].curPos--;
      break;
    case 2:
      lcd.print("2");
      t = shoulder;
      servosPos[t].curPos--;
      break;
    case 3:
      lcd.print("3");
      t = elbow;
      servosPos[t].curPos--;
      break;
    case 5:
      lcd.print("4");
      t = base;
      servosPos[t].curPos++;
      break;
    case 6:
      lcd.print("5");
      t = shoulder;
      servosPos[t].curPos++;
      break;
    case 7:
      lcd.print("6");
      t = elbow;
      servosPos[t].curPos++;
      break;
    case 9:
      lcd.print("7");
      t = wristflex;
      servosPos[t].curPos--;
      break;
    case 10:
      lcd.print("8");
      t = wristrot;
      servosPos[t].curPos--;
      break;
    case 11:
      lcd.print("9");
      t = gripper;
      servosPos[t].curPos--;
      break;
    case 13:
      lcd.print("*");
      t = wristflex;
      servosPos[t].curPos++;
      break;
    case 14:
      lcd.print("0");
      t = wristrot;
      servosPos[t].curPos++;
      break;
    case 15:
      lcd.print("#");
      t = gripper;
      servosPos[t].curPos++;
      break;
  }
  servosPos[t].curPos = constrain(servosPos[t].curPos, servosPos[t].maxPos, servosPos[t].minPos);
  jointPos(t, servosPos[t].curPos);
}

void jointPos(byte t, byte pos) {    //定义两个byte类型的变量,t,pose.
  lcd.setCursor(6, 1);//电机所在位置名称
  switch(t) {
    case base:               // 1, 4
      lcd.print("bse");    //LCD显示bse
      break;
    case shoulder:           // 2, 5
      lcd.print("shl");   //LCD显示shl
      break;
    case elbow:              // 3, 6
      lcd.print("elb");    //LCD显示elb
      break;
    case wristflex:          // 7, *
      lcd.print("wfx");   //LCD显示wfx
      break;
    case wristrot:           // 8, 0
      lcd.print("wrt");   //LCD显示wrt
      break;
    case gripper:            // 9, #
      lcd.print("grp");    //LCD显示grp
      break;
  }

  lcd.setCursor(2, 3);// 设置显示位置第4行,3列就是说前面空2格。
  lcd.print(" you are welcome  ");
  lcd.setCursor(6, 2);//pose后面显示的角度位置。
  lcd.print(pos, DEC); //当按键按下后显示角度值。
  servos[t].write(pos);
}

void setupDisplay() {    //子程序定义,LCD显示内容,开机立即显示。
  lcd.clear();          //LCD清屏
  lcd.blink_off();       //LCD光标闪烁关
  lcd.home();         //
  lcd.setCursor(1, 1);  //设置显示位置第2行,2列就是说前面空1格。
  lcd.print("key: ");   //显示内容 “key”
  lcd.setCursor(4, 0);   //设置显示位置第一行,5列就是说前面空4格。
  lcd.print("alsrobotbase      ");//显示内容”alsrobotbase”
  lcd.setCursor(1, 2);         // 设置显示位置
  lcd.print("Pos: ");           //显示内容”Pos”
}
电控部分说明书
6自由度机械臂机械部分安装说明
按压式大按钮模块使用说明书
IIC 2004液晶扩展板使用说明书
V5.0传感器扩展板使用说明
Arduino UNO入门教程
Arduino UNO 驱动安装
Arduino UNO 编程参考手册
产品相关推荐
产品购买地址
周边产品推荐
相关问题解答
arduino六自由机械臂编译不成功问题
Arduino UNO R3 可以实现机械臂控制吗?
6自由度机械臂舵机容易被拉下来
相关学习资料
AS-6DOF铝合金机械臂功能演示之定位抓取
6自由度机械臂玩儿家测评一
6自由度机械臂玩儿家测评二
奥松机器人技术论坛


